

Crochet Lace Bodice Dress | Free Project
Published by Nannette D. | The Textile District on Jul 8th 2019
Updated September 2026 with refreshed sewing guidance, current fabric information and improved pattern organization.
This vintage-inspired crochet lace dress combines two crafts in one project: a hand-crocheted floral yoke and a softly gathered fabric skirt.
The crochet bodice was reconstructed from an antique piece handed down through our family and believed to date to the 1920s. Because the original pattern was not available, the instructions below were recreated from the finished garment as carefully as possible.
The result is an intermediate-level project that can be adapted to your own measurements by changing the number of floral motifs and the depth of the crochet mesh.
For the refreshed version of this project, we paired the white crochet yoke with Hannah Mini Blossom, a romantic floral print in soft rose, blush and green on a light ground.
Crochet Lace Bodice Dress Project
Skill level: Intermediate
Finished size: Custom
The original dress has a front skirt length of approximately 28" from the lower yoke edge and a center-back length of approximately 36".
The original crochet bodice uses 12 floral motifs to create an approximately 30" circumference, plus four motifs on each side to form the shoulder sections.
Because the motifs are joined during the final round, you can add or remove motifs to adjust the circumference before completing the neckline, shoulder and lower mesh sections.
How to Adjust the Crochet Bodice Size
The circumference of the bodice is controlled primarily by the size and number of floral motifs.
Work the motifs into a continuous band until the piece fits comfortably around the upper body without stretching.
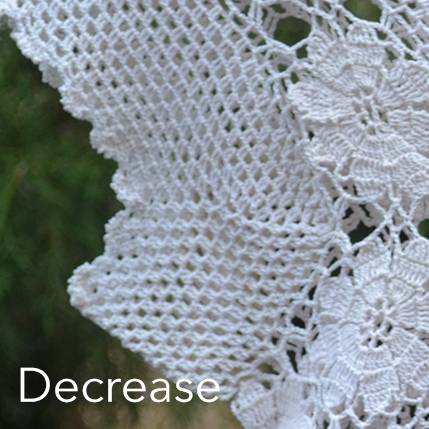
The neckline, cap sleeves and lower chest band are created with crochet mesh. Their depth can be adjusted by changing the number of mesh rows.
Before beginning the skirt, measure the completed lower edge of the crochet yoke without stretching it. That measurement determines how much fabric fullness you will need.
Materials for the Crochet Yoke
- Crochet thread, size 20, 100% cotton; approximately 2 x 30g balls
- Steel crochet hook, U.S. size 10 / 1.0 mm
- Yarn needle
- Blocking pins
Gauge: One floral motif measures approximately 2.5" / 7.5 cm in diameter.
Materials for the Fabric Skirt
- Approximately 2 yards of lightweight fabric, 58"–60" wide
- Matching sewing thread
- Basic sewing and pressing tools
The original skirt construction is designed for an allover, non-directional print. If you use a one-way or strongly directional design, recalculate the yardage and cutting layout before cutting.
Cotton Pima Lawn is particularly well suited to this style because its lightweight hand and soft drape complement the open crochet yoke and gathered skirt.
Floral Crochet Motif
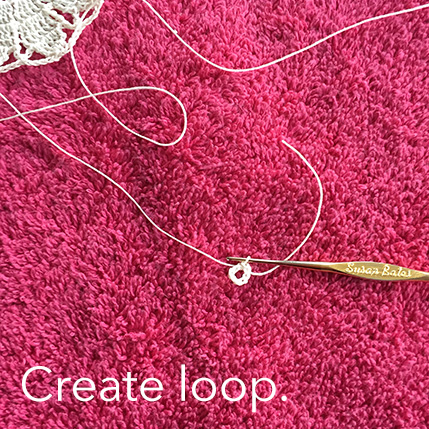
Foundation: Ch 8. Sl st in beg ch to form a ring.
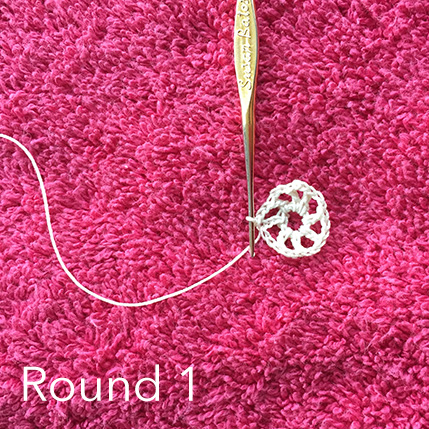
Round 1: Ch 5 (counts as dc, ch 2), *dc in ring, ch 2; rep from * 7 times. Sl st in 3rd ch of first ch-5 to join — 8 ch-2 sps.
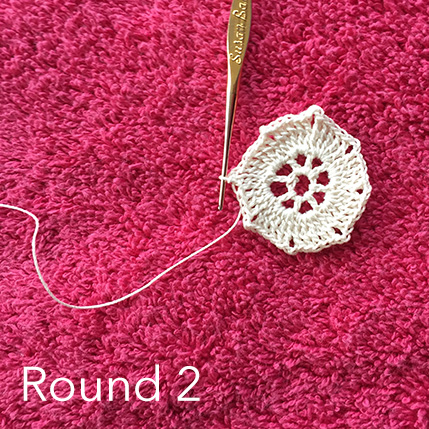
Round 2: Sl st in next ch-2 sp, ch 4 (counts as first tr), 4 tr in same ch-2 sp, *ch 2, 5 tr in next ch-2 sp; rep from * 7 times, ch 2, sl st in 4th ch of first ch-4 to join — 8 petal bases.
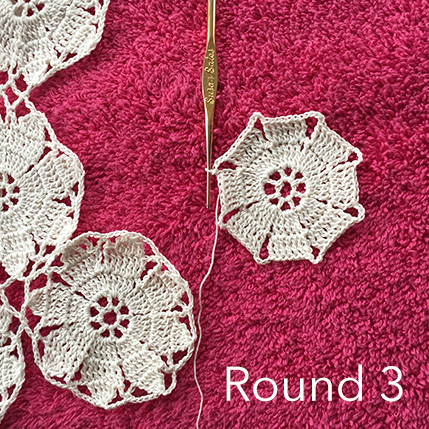
Round 3: Ch 4 (counts as first tr), tr in same st as join, tr in each of next 3 tr, 2 tr in next tr, *ch 4, 2 tr in next tr, tr in next 3 tr, 2 tr in next tr; rep from * 7 times, ch 4, sl st in top of first ch-4 to join.
Round 4: Sl st in next tr, ch 4 (counts as first tr), 5 tr cl across next 4 tr, *ch 5, sc in next ch-4, ch 5, sk 1 tr, 5 tr cluster {Tr5tog} across next 5 tr, ch 5; rep from * 7 times, sl st in top of first 5-tr cluster to join. Tie off first motif and weave in ends.
Joining the Floral Motifs
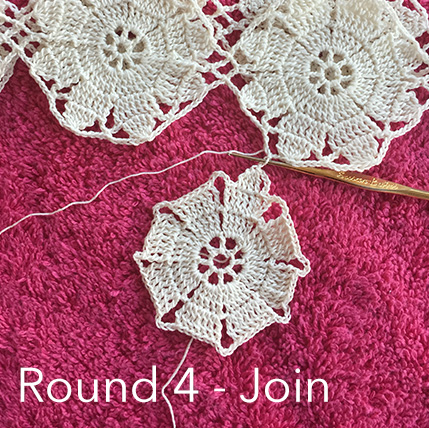
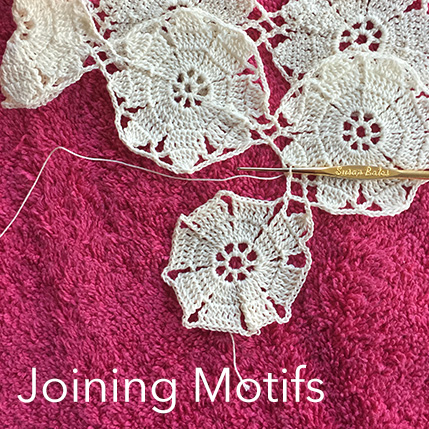
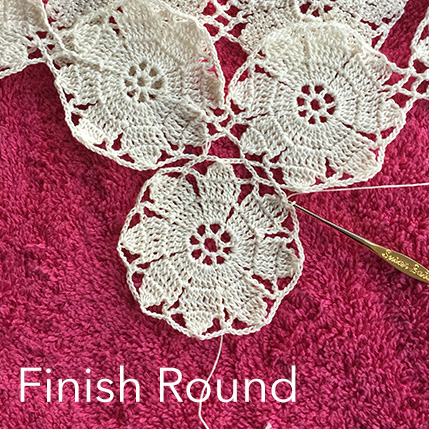
Repeat Rounds 1–3 as for the first floral motif. When joining motifs, make sure the right sides are facing.
Round 4: Sl st in next tr, ch 4 (counts as first tr), complete the first 5 tr cl across next 4 tr, *ch 5, sc in next ch-4, ch 5, sk 1 tr, 5-tr cluster {Tr5tog} across next 5 tr, ch 5; rep from * 6 times.
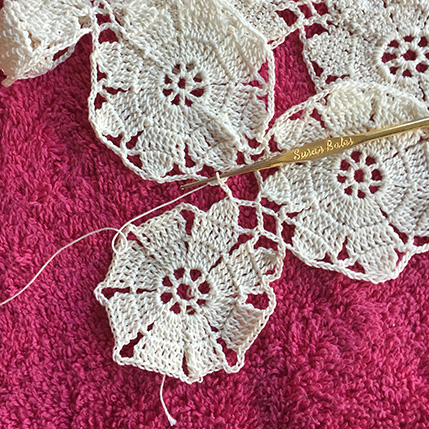
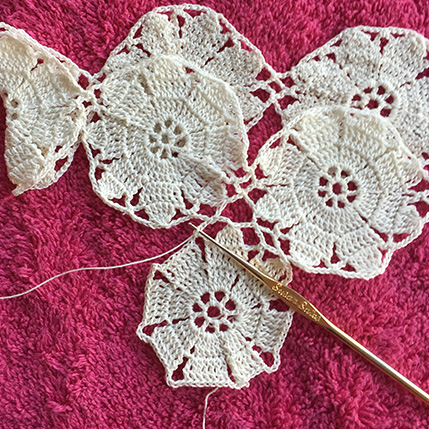
To join two motifs and finish the round: ch 3, sl st in ch-5 sp of first motif (space between first cluster and sc), ch 3, sc in next ch-5 sp of motif in progress, ch 3, sl st in next ch-5 sp of first motif (space between sc and cluster), ch 3, sl st in top of Tr5tog of motif in progress to join and complete second motif.
Tie off and weave in ends.
Continue joining floral motifs in a straight band until you reach the circumference required for the bodice.
Finish the Crochet Bodice
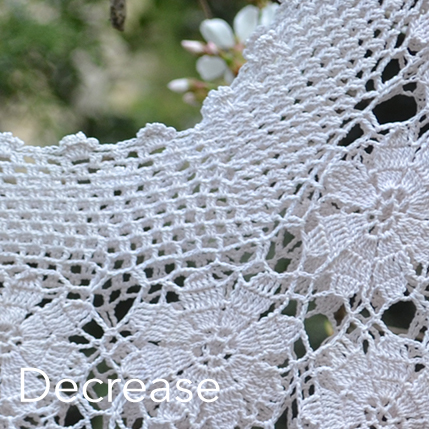
- A simple crochet mesh with picot edging finishes the neckline, shoulder sections and lower chest band.
- Once the floral motif band is complete, place the crochet flat with the right side facing.
- Identify the neckline, shoulder and lower-band sections before beginning the mesh because the shaping differs slightly.
- The finished depth can be adjusted by adding or reducing mesh rows.
Crochet Mesh Pattern
Foundation Row: Join with a sl st in ch-5 space before point where two floral motifs join. Ch 4 (counts as first tr), tr in the same sp, ch 2, skip point where motifs join, 2 tr in ch-5 sp of the next floral motif, ch 6, *(dc in next ch-5 sp, ch 6) 4 times, 2 tr in ch-5 sp ahead of next motif join, ch 2, 2 tr in ch-5 sp beyond motif join; rep from * to end of row and sl st to top of ch-4 (first tr).
Row 1: Sl st in space between 2 tr, ch 5 (counts as first dc, ch 2), *(dc in next ch-6 space, ch 2, dc in next dc) 4 times, ch 2, dc in next ch-6 sp, (dc in next tr, ch 2) twice; rep from * around, sl st in top of starting dc to join.
Row 2: Sl st in ch-2 sp, ch 3 (counts as first dc), dc in same sp, *ch 2, 2 dc in next ch-2 space; rep from * across to point before shoulder straps attach, 2 dc in next ch-2 sp twice to decrease, continue pattern from * to next join and repeat around, sl st to top of first dc to join.
Rows 3–7: Repeat Row 2. Adjust the number of rows as needed to achieve the desired mesh depth.
Picot Edging — Final Round: Sl st in next ch-2 sp, ch 3 (counts as first dc), picot at top of dc (ch 3, sl st in top of dc), (dc, picot) 4 times, *ch 3, sk 2 dc, sc in between next 2 dc, sk 2 dc, (dc, picot) 5 times in next ch-2 sp; rep from * around, sl st in top of first dc.
Repeat the picot edging around the neckline, cap sleeves and lower band. Weave in ends.
Crochet Abbreviations
- beg = beginning
- ch = chain
- sc = single crochet
- dc = double crochet
- tr = treble/triple crochet
- cl = cluster
- Tr5tog = 5-treble cluster
- rep = repeat
- sl st = slip stitch
- yo = yarn over
- sp = space
How to Make a 5-Treble Cluster {Tr5tog}
This stitch is made from five partial trebles worked across subsequent stitches and completed by drawing the final loop through all remaining loops on the hook.
Initial 5-treble cluster: Ch 4. This ch-4 counts as the first tr. Yarn over twice. Insert the hook into the next tr, yarn over and pull up a loop. Yarn over and pull through 2 loops twice. You should now have 2 loops remaining on the hook.
*Yarn over twice. Insert the hook into the next tr, yarn over and pull up a loop, yarn over and pull through 2 loops twice; repeat from * twice more. There should now be 5 loops remaining on the hook. Yarn over and pull through the remaining loops.
Subsequent Tr5tog: *Yarn over twice. Insert the hook into the next tr, yarn over and pull up a loop. Yarn over and pull through 2 loops twice; repeat from * 4 more times. There should now be 6 loops remaining on the hook. Yarn over and pull through all remaining loops.
Cut the Fabric Skirt
Measure the lower edge of the completed crochet yoke without stretching it.
The skirt circumference should measure approximately 2–2½ times the yoke circumference to create the gathered fullness.
The original design also includes a wide gathered ruffle along the asymmetrical hem.
- Fold the fabric lengthwise with right sides together.
- Cut two approximately 9" strips along the printed length for the ruffle and set them aside.
- Sew the ends of the remaining fabric together to form the skirt circumference and finish the seam with a serger or zigzag stitch.
- Fold the seamed fabric with the seam centered and the selvage edges aligned.
- Measure approximately 21" from the upper edge along one fold and approximately 29" along the opposite fold.
- Draw a gentle curve between the two points and cut along the line to create the asymmetrical skirt hem.
These measurements reproduce the proportions of the original project. Adjust the lengths to suit the wearer and the completed yoke.
Make the Gathered Ruffle
- Sew the short ends of the two ruffle sections together to create one continuous loop and finish the seams.
- Finish the lower ruffle edge with a narrow double-fold hem or a serged and single-fold hem.
- Finish the upper raw edge with a serger or zigzag stitch.
- Quarter-mark the upper ruffle edge.
- Sew two rows of gathering stitches approximately ¼" and ⅜" from the upper edge.
- Quarter-mark the lower skirt edge.
- With right sides together and quarter marks aligned, pin the ruffle to the skirt.
- Pull the gathering threads until the ruffle fits the skirt evenly.
- Sew the ruffle to the skirt using a ½" seam allowance.
- Press the seam allowance toward the skirt and remove visible gathering stitches.
Attach the Fabric Skirt to the Crochet Yoke
- Finish the upper raw edge of the skirt with a serger or zigzag stitch.
- Quarter-mark both the upper skirt edge and the lower edge of the crochet yoke.
- Sew two rows of gathering stitches around the upper skirt approximately ¼" and ⅜" from the edge.
- Place the skirt seam at the left side and match the quarter marks.
- Lap the lower edge of the crochet yoke over the gathered skirt edge by approximately ½".
- Pull the gathering threads until the skirt matches the yoke circumference and distribute the gathers evenly.
- Using thread that matches the yoke, carefully stitch the crochet edge to the gathered skirt without stretching the crochet.
- Remove any visible gathering stitches.
How to Crochet the Floral Motif
The original step photographs are useful visual references for the motif and joining process, so I would keep them in the article.
About This Vintage Crochet Pattern
Please note: The source of the original crochet pattern is unknown. These instructions were reconstructed from a finished antique crochet bodice handed down through our family and believed to date to the 1920s.
Because the pattern was reverse-engineered from the original garment rather than copied from a surviving written pattern, makers may need to adjust motif count, mesh depth or shaping to suit their individual measurements and crochet gauge.
Choose Fabric for the Skirt
A lightweight woven fabric with soft drape works best with the delicate crochet yoke and gathered silhouette.
Cotton Pima Lawn is particularly well suited to the project because it is lightweight, smooth and fluid enough to gather without creating unnecessary bulk at the crochet edge.
For the refreshed project image, we paired the yoke with Hannah Mini Blossom, a romantic floral print that complements the vintage character of the crochet work.
Browse Artist-Designed Fabric by the Yard
If you have your own artwork, you can also print your design on Cotton Pima Lawn or another suitable apparel textile.
Compare Lightweight Apparel Fabrics
The same dress can look very different depending on the base textile beneath the print. Compare weight, hand, drape and printable width before choosing fabric for the skirt.