
Crochet Lace Bodice Dress | Free Project
Published by Nannette D on Jul 8th 2019
Let’s get vintage-inspired! For this project, we recreated an antique crochet lace bodice from the 1920's to embellish a simple dress pattern. The result? A totally unique piece of wearable art!
What I love most about this project is that it combines my favorite crafts: crochet and sewing! The original bodice was an antique handed down by my mother, so we don't have the pattern, so recreated the crochet pattern (to the best of our ability), as well as a simple dress pattern, so you can give them both a try. Or, you could invite a friend to share the project and trade your expertise!
The flowing ruffled silhouette and asymmetrical hemline of this dress pattern is flattering on everyone, and is suited to any soft fabric. For this project, we selected our Waves abstract floral design custom printed on Cotton Pima Lawn base fabric, but you can choose any design from our online fabric catalog to custom print by the yard so you can make this project entirely your own!
So, let’s get to it!…
Lace Crochet Pattern and Sewing Instructions
Skill Level: Intermediate
Finished project size: Custom; front skirt length is 28” from lower yoke edge; center back length is 36”.
NOTE: The original bodice is made up of 12 motifs (30" circumference), plus 4 motifs each side to create the shoulder bands.
Sizing Tips and Hints
The circumference of the crochet bodice and the length of the shoulder straps are controlled by the size and number of motifs, and because you join the motifs in the final round, you can keep adding motifs until you reach the final measurements you need. It's that easy.
A simple mesh edging finishes the neckline, creates a cap sleeve and the lower chest band -- the width of each is adjusted by the number of rows you stitch.
MATERIALS REQUIRED
Supplies for Crochet Yoke
- Crochet Thread Size 20 (100% cotton); 2 [30g] balls
- Steel Crochet Hook: U.S. Size 10 (1.0 mm)
- Notions: yarn needle, blocking pins.
- Gauge: one motif = 2.5"/7.5 cm in diameter
Supplies for Dress
- 2 yards lightweight fabric in an allover print, 58" - 60" wide
- Matching thread
- Basic sewing and pressing supplies
Note: This dress is cut along the fabric length, so it's suitable for allover, non-directional prints. If using a one-way print, refigure the yardage based on the drafted shapes included below.
CROCHET LACE BODICE INSTRUCTIONS
Floral Crochet Motif
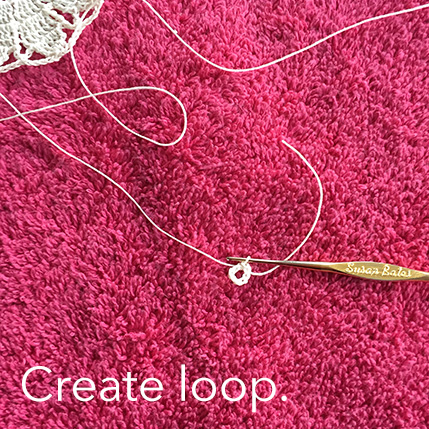
Ch 8. Sl st in beg ch to form a ring.
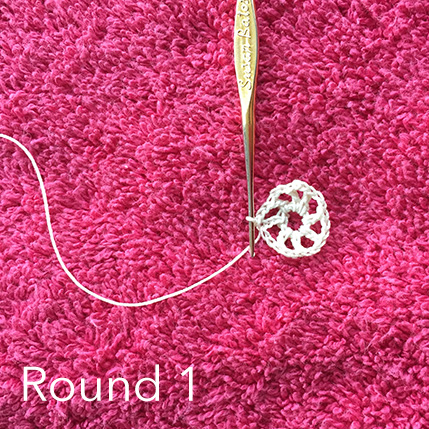
Round 1: Ch 5 (counts as dc, ch2), *dc in ring, ch 2; rep from * 7 times. Sl st in 3rd ch of first ch-5 to join -- 8 ch-2 sps.
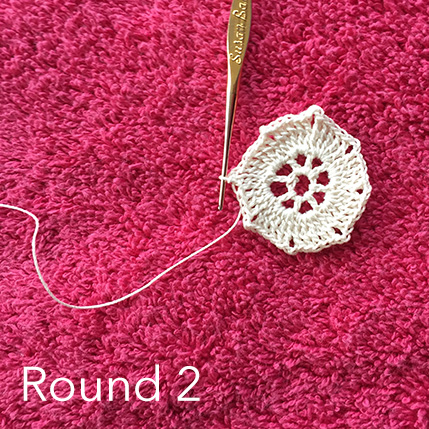
Round 2: Sl st in next ch-2 sp, ch 4 (counts as first tr), 4 tr in same ch-2 sp, *ch 2, 5 tr in next ch-2 space; rep from * 7 times, ch 2, sl st in 4th ch of first ch-4 to join -- 8 petal (bases).
Round 3: Ch 4 (counts as first tr), tr in same st as join, tr in each of next 3 tr, 2 tr in next tr, *ch 4, 2 tr in next tr, tr in next 3 tr, 2 tr in next tr; rep from * 7 times, ch 4, sl st in top of first ch-4 to join.
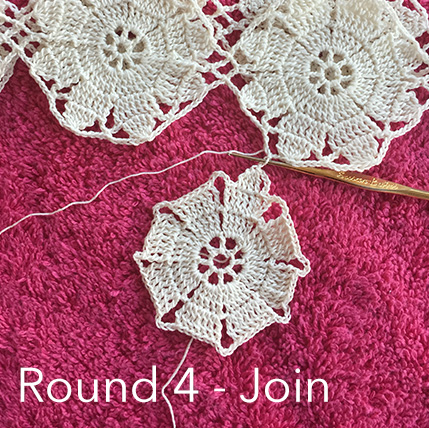
Round 4: Sl st in next tr, ch 4 (counts as first tr), 5 tr cl across next 4 tr, *ch 5, sc in next ch-4, ch 5, sk 1 tr, 5 tr cluster {Tr5tog} across next 5 tr, ch 5; rep from * 7 times, sl st in top of first 5-tr cluster to join. Tie off first motif. Weave in ends.
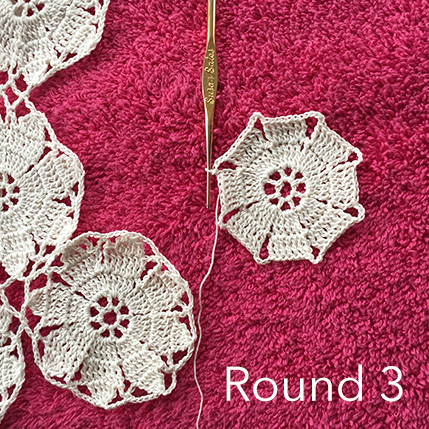
Joining Motifs
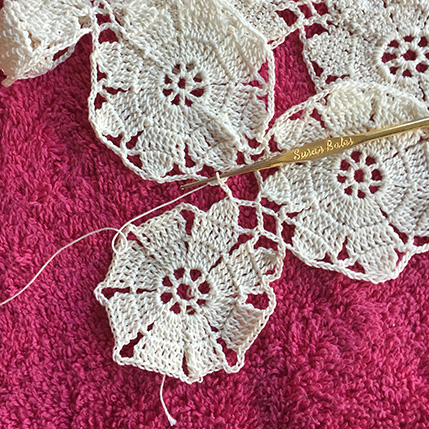
Rep Rounds 1-3 same as first Floral Motif. When joining motifs, make sure the right sides are facing.
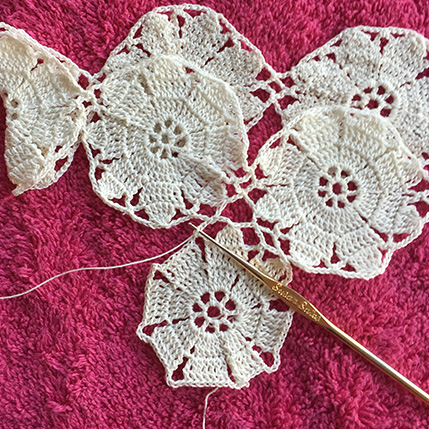
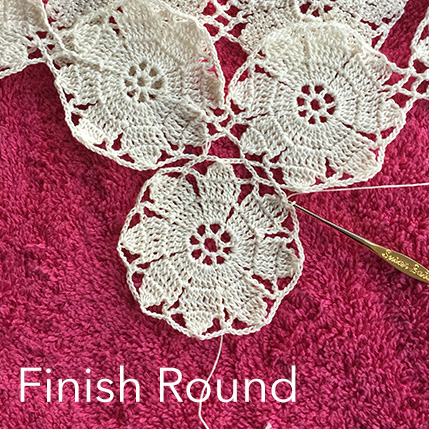
Round 4: Sl st in next tr, ch 4 (counts as first tr), complete the first 5 tr cl across next 4 tr, *ch 5, sc in next ch-4, ch 5, sk 1 tr, 5-tr cluster {Tr5tog} across next 5 tr, ch 5; rep from * 6 times. To join two motifs and finish round: ch 3, sl st in ch-5 sp of first motif (sp between first cluster and sc), ch 3, sc in next ch-5 sp of motif in progress, ch3, sl st in next ch-5 sp of first motif (sp between sc and cluster), ch 3, sl st in top of Tr5tog of motif in progress to join and complete second motif. Tie off motif. Weave in ends.
Continue joining floral motifs in a straight band to create the circumference you require for your bodice.
Tips for Finishing Crochet Bodice
- A simple crochet mesh with a picot edging finishes the neckline, shoulder straps (creates a slight cap sleeve) and lower chest band.
- Once you have the floral motif portion complete, place your crochet on a flat surface to ensure you are working with the right side facing.
- Confirm which part of the bodice you are finishing, as the starting instructions vary slightly for each.
- Each section is worked in rows following the instructions below.
Crochet Mesh Pattern
Foundation Row: Join with a sl st in ch-5 space before point where two floral motifs join. Ch 4 (counts as first tr), tr in the same sp, ch 2, skip point where motifs join, 2 tr in ch-5 sp of the next floral motif, ch 6, *(dc in next ch-5 sp, ch 6) 4 times, 2 tr in ch-5 sp ahead of next motif join, ch 2, 2 tr in ch-5 sp beyond motif join; rep from * to end of row and sl st to top of ch-4 (first tr).
Row 1: Sl st in space between 2 tr, ch 5 (counts as first dc, ch 2), *(dc in next ch-6 space, ch 2, dc in next dc) 4 times, ch 2, dc in next ch-6 sp, (dc in next tr, ch 2) twice; rep from * around, sl st in top of starting dc to join.
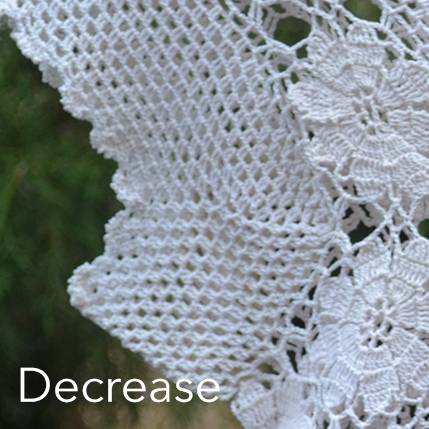
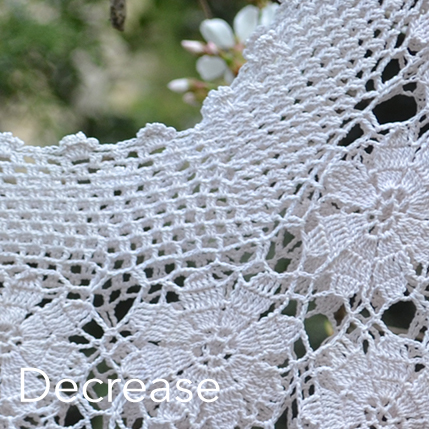
Row 2: Sl st in ch-2 sp, ch 3 (counts as first dc), dc in same sp, *ch 2, 2 dc in next ch-2 space; rep from * across to point before shoulder strapes attach, 2 dc in next ch-2 sp (twice) to decrease, continue pattern from * to next join and repeat around, sl st to top of first dc to join.
Row 3 - 7: Rep Row 2. Note: you can adjust number of rows to get the depth of crochet mesh desired.
Picot Edging - Final Round: Sl st in next ch-2 sp, ch 3 (counts as first dc), picot at top of dc (ch 3, sl st in top of dc), (dc, picot) 4 times, *ch 3, sk 2 dc, sc in between next 2 dc, sk 2 dc, (dc, picot) 5 times in next ch-2 sp; rep from * around, sl st in top of first dc. Repeat around neckline, cap sleeves and lower band. Weave in ends.
Abbreviations
beg = beginning
ch = chain
sc = single crochet
dc = double crochet
tr = treble/triple crochet
cl = cluster
Tr5tog = 5-treble cluster
rep = repeat
sl stst = slip stitch
yo = yarn over
sp = space
How to Make 5-Treble Cluster {Tr5tog}:
This stitch is made up of five partial trebles, each made in a subsequent stitch, and completed by pulling the final loop through all loops on your hook. Simply put, we're turning 5 trebles into 1 stitch.
To make the initial 5-treble cluster at the beg of the round, ch 4. This ch-4 will count as your first tr. Yarn over twice. Insert your hook into the next tr, yarn over and pull up a loop. Yarn over and pull through 2 loops twice. You should now have 2 loops left on your hook. One of these loops is the last ch from the beg ch-4 and one is the last unworked loop of the partial tr just made. *Yarn over twice. Insert your hook in the next tr, yarn over and pull up a loop, yarn over and pull through 2 loops twice; rep from * twice more. There should now be 5 loops rem on your hook. Yarn over and pull through rem loops on your hook.
Subsequent Tr5tog: *Yarn over twice. Insert your hook into the next tr, yarn over and pull up a loop. Yarn over and pull through 2 loops twice; rep from * 4 more times. There should now be 6 loops rem on your hook. Yarn over and pull through all rem loops on your hook.
SEWING INSTRUCTIONS
Cutting the Dress Pattern
- Measure the yoke lower edge circumference without stretching. The dress skirt should be 2 to 2 ½ times that measurement to allow for gathers, and the ruffle should be 2 to 2 ½” times the skirt circumference.
- Fold the fabric lengthwise, rights sides together, matching cut the ends and selvages. Cut two 9” ruffles along the printed length and set aside.
- To make the skirt, sew the ends of the remaining fabric together. Finish the seam with serging or zigzagging to prevent raveling. Fold the seamed fabric right side out with the seam in the center, aligning the selvage edges. Measure 21” from the upper print edge and mark along the left fold. Measure 29” from the upper print edge and mark along the right fold. Draw a gently curved line between the two marks and cut along the line to create the skirt hemline. Save the cut-off fabric for another project.
Making the Ruffled Skirt
- Sew the short ends of the ruffle pieces together to make a circle; finish the seam. Using the seams as halfway points, quarter-mark the ruffle circumference upper edge.
- Finish the ruffle hem edge with serging and a single-fold hem, or a narrow double hem. Finish the upper edge with serging or zigzagging.
- Sew two rows of gathering stitches along the upper ruffle ¼” and 3/8” from the edge, breaking the stitching at the side seams.
- Finish the lower skirt edge with serging or zigzagging. Beginning with the side seam, quarter-mark the hemline edge of the skirt.
- With right sides together and matching quarter markings, pin the upper ruffle edge to the skirt lower edge. Pull up the gathers to fit and adjust the fullness evenly around the circumference, pinning frequently.
- Sew the ruffle to the skirt using a ½” seam allowance. Press the seam allowances toward the skirt. Remove any visible gathering stitches.
Attaching the Skirt
- Finish the upper skirt edge with serging or zigzagging. Quarter-mark the upper skirt edge and the lower edge of the crocheted yoke.
- Sew two rows of gathering stitches around the upper skirt ¼” and 3/8” from the edge, breaking the stitching at the side seam and the opposite quarter marking.
- Matching the quarter marks and placing the skirt seam at the left side, lap the yoke lower edge over the skirt upper edge ½”. Pin. Pull up the gathering threads to match the yoke size and evenly distribute the gathers. Pin closely around the circumference.
- Using thread that matches the yoke, carefully stitch the lower yoke edge to the gathered skirt, taking care to not stretch the yoke edge. Remove any visible gathering stitches.
How To Crochet Floral Motif
-
-
-
-
-
-

-
-
-
-
-
 Please Note: The original crochet pattern source is unknown and we have done our best to recreate the crochet instructions from a crochet bodice handed down (estimated origin: 1920's).
We welcome input to correct errors or improvements: Contact Us.
Let's Talk Textiles!
Join our mailing list to stay up to date about new design arrivals, fabric updates, and much more. To thank you for joining, we'll send you a Welcome Coupon to take 15% off your first custom printed fabric order > > Sign Up Today
How To Order Custom Printed Fabrics on The Textile District:
Each image represents 27" of printed fabric and clicks through to the product page for easy ordering:
- Choose any base fabric (15+ options)
- Select the color way you wish to print (click the icon)
- Enter the quantity you need (all print by the yard)
- Add to cart to order
As always, if you have a question or need help choosing which base fabric option is best for your project at hand, we are here to help. Please send us a note or give us a call. We'd love to hear from you!
Not sure which base fabric is most suitable for your next project?
© 2023 The Textile District www.thetextiledistrict.com | Need Help? Call us on 704-814-0712
All designs are the licensed property of the featured artist.